Networking (IoT): WiFi and Bluetooth
This week, we learned how to connect our microcontrollers to external devices using wifi and bluetooth. To get started, I went through the tutorial on the course site to connect an LED to some buttons on my website.
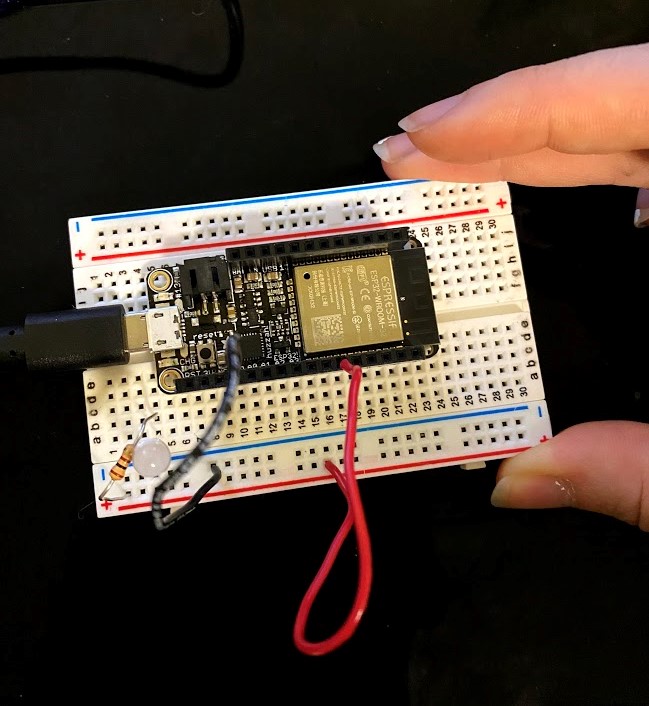
First, I built a simple circuit connecting an LED to my ESP32 microcontroller. I connected the black wire from the negative rail to ground, the red wire from the positive rail to pin 5, a 100 ohm resistor from the positive rail to the positive side of my led, and an led connected that resistor to the negative rail. From there, I could setup my firebase web app by following the tutorial from the course page. Everything was working smoothly, until I remembered that, being on campus, I could not exactly use my home network. So, I had to improvise.
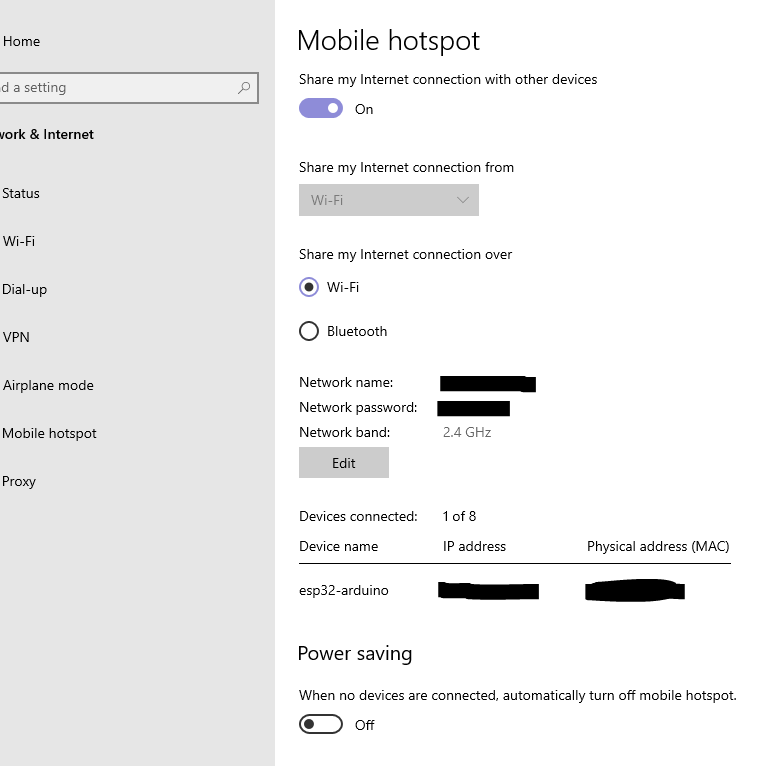
I am currently using a windows 10 machine, so I had the capability to generate a hotsopt. To do this, I clicked on the search icon on my task bar and typed "mobile hotspot". Press enter, and I was directed to a settings window where I could toggle a hotspot on. After giving it a name and a password, I turned the power saving switch off. This step is extremely important, as the hotspot won't be on for connection without it. From there, I could run the code from the course site and connect my microcontroller!
Now, all I had to do was import my firebase app information into the code provided on the course page and I had working lights! I showed how the website buttons work on a previous version of this page, but I removed them as they no longer work. Stay tuned for some buttons you can actually press!
From here, I wanted to examine what more I could do with a Wifi connection, so I wanted to build a virtual piano that played notes on my piezo buzzer.
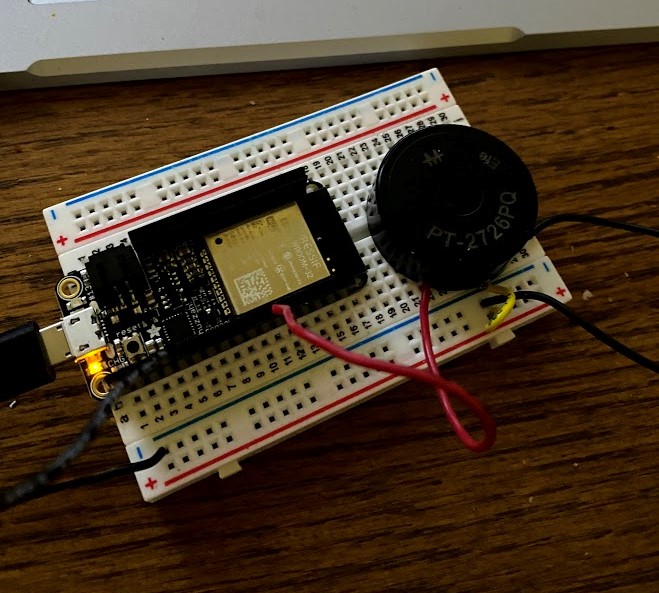
To do this, I modified the code from the tutorial to include a few more buttons and built a circuit to connect the buzzer to the huzzah. All I changed in the circuitry was connecting the huzzah pin 5 to the buzzer's positive pin, the end of that pin to the positive rail with a separate wire, and the negative pin of the buzzer to the negative rail. For the code, I simply added a few more recognized strings to the firebase database from the demo and created more buttons to activate those strings and their corresponding pitches.
#include <WiFi.h>                                 // esp32 library
#include <FirebaseESP32.h>                        // firebase library

#define FIREBASE_HOST Fill_in_with_your_Info      // the project name address from firebase id
#define FIREBASE_AUTH Fill_in_with_your_Info      // the secret key generated from firebase
#define WIFI_SSID     Fill_in_with_your_Info      // input your home or public wifi name
#define WIFI_PASSWORD Fill_in_with_your_Info      // password of wifi ssid

String fireString = "";                                          // piano status received from firebase

//Define FirebaseESP32 data object
FirebaseData firebaseData;

int freq = 2000;
int channel = 0;
int resolution = 8;

void setup() {
  Serial.begin(115200);
   ledcSetup(channel, freq, resolution);
  ledcAttachPin(5, channel);
  delay(1000);
  pinMode(5, OUTPUT);
  WiFi.begin(WIFI_SSID, WIFI_PASSWORD);                          // try to connect with wifi

  Serial.print("Connecting to ");
  Serial.print(WIFI_SSID);
  while (WiFi.status() != WL_CONNECTED) {
    Serial.print(".");
    delay(500);
  }

  Serial.println();
  Serial.print("Connected to ");
  Serial.println(WIFI_SSID);
  Serial.print("IP Address is : ");
  Serial.println(WiFi.localIP());                                // print local IP address
  Firebase.begin(FIREBASE_HOST, FIREBASE_AUTH);                  // connect to firebase
  Firebase.reconnectWiFi(true);
  Firebase.set(firebaseData, "/PIANO_NOTE", "OFF");              // set initial string of "OFF"
}

void loop() {

  Firebase.get(firebaseData, "/PIANO_NOTE");                     // get piano status input from firebase
  fireString = firebaseData.stringData();                        // change to e.g. intData() or boolData()
  Serial.println(fireString);

   if (fireString == "C_LOW") {
    Serial.println("Playing LOW C");
     ledcWriteTone(channel, 261.63);
   }

  else if (fireString == "C#") {
    Serial.println("Playing C#");
     ledcWriteTone(channel, 277.18);
  }

   else if (fireString == "D") {
    Serial.println("Playing D");
     ledcWriteTone(channel, 293.66);
  }

   else if (fireString == "D#") {
    Serial.println("Playing D#");
     ledcWriteTone(channel, 311.13);
  }

  else if (fireString == "E") {
    Serial.println("Playing E");
     ledcWriteTone(channel, 329.63);
  }

   else if (fireString == "F") {
    Serial.println("Playing F");
     ledcWriteTone(channel, 349.23);
  }

  else if (fireString == "F#") {
    Serial.println("Playing F#");
     ledcWriteTone(channel, 369.99);
  }

   else if (fireString == "G") {
    Serial.println("Playing G");
     ledcWriteTone(channel, 392);
  }

   else if (fireString == "G#") {
    Serial.println("Playing G#");
     ledcWriteTone(channel, 415.30);
  }

  else if (fireString == "A") {
    Serial.println("Playing A");
     ledcWriteTone(channel, 440);
  }

   else if (fireString == "A#") {
    Serial.println("Playing A#");
     ledcWriteTone(channel, 466.16);
  }

   else if (fireString == "B") {
    Serial.println("Playing B");
     ledcWriteTone(channel, 493.88);
  }

   else if (fireString == "C_HIGH") {
    Serial.println("Playing High C");
     ledcWriteTone(channel, 523.25);
  }

  else if (fireString == "OFF") {
    Serial.println("Piano OFF");
     ledcWriteTone(channel, 0);
  }

  else {
    Serial.println("Please send ON/OFF");
  }

  delay(1000);                                 // not strictly necessary
}
Here's my piano. Enjoy!